If you have ever wanted to host your own website on your Home server containing your own content without the monthly bills from a hosting provider, or potentially host your own cloud file storage to ensure the upmost privacy of your personal data, or any other such hosting desires; LAMP is a necessity. The Lamp Package includes the fundamental tools for serving web apps including Apache, php, and MySQL.
This tutorial will guide you through installing what is known as the “Lamp Stack” on a fresh copy of Ubuntu, witch will serve as a prerequisite for upcoming guides on WordPress & NextCloud.
Creating the LXC Container
We will be using a container opposed to a VM for several reasons, but primarily for Security & limited resource consumption.
We will start out by updating our Proxmox Templates so that we have the most current to download from.
- Login to the Proxmox console, or a puTTy session as root
- Type:
pveam update - Type:
apt-get update - Type:
apt-get dist-upgrade
This will update our template list, and upgrade our Proxmox to push the changes forward.
In our Proxmox GUI frontend under the node we would like to install our new web-server, click on Local (Storage Space) then select “Content” , now in the right hand pain click on “Templates“
You should be presented with a window listing all the available options, I am currently using Proxmox 5.4 which does not support Ubuntu 19.10 at the moment, so I will be Selecting 19.04.
- Select ubuntu-19.04-standard_19.04-1
- Click on Download
Setting up our Use
With the console open we need to set up our first user we can do this with the following commands:
adduser binkyusermod -aG sudo binky
Now with our user created and provided “sudo” privileges, we can continue in the console, or I prefer to move over to puTTy at this time.
Update Our Distribution
Now before we go much further, lets go ahead and update our distribution, to ensure we are completely up to date.
- Type:
sudo apt update - Type:
sudo apt upgrade - Type:
sudo apt autoremove
Alright, with that done, we are all ready to begin the installation of what is known as the LAMP Stack.
Installing Apache & Configuring Firewall
Apache is our “Web Server” software and is what allows you to host your WordPress on the Web! We can simply install it with the following:
- Type:
sudo apt-get install apache2
Once the installation is completed, we need to set up our Firewall to allow connections in and out on ports 80, 443.
- Type:
sudo ufw app list
Available applications:
  Apache
  Apache Full
  Apache Secure
  OpenSSH
  Postfix
  Postfix SMTPS
  Postfix Submission
You should see something similar, we would like to enable both Apache, and OpenSSH, we do so with the following:
- Type:
sudo ufw allow OpenSSH - Type:
sudo ufw allow in "Apache Full"
Rules updated
Rules updated (v6)
Now we simply need to enable our firewall, and we can do that with the following:
- Type:
sudo ufw enable
Command may disrupt existing ssh connections. Proceed with operation (y|n)? y
Firewall is active and enabled on system startup
Finally we will check the status, and verify our input is correct with the following command:
- Type:
sudo ufw status
Now let’s go ahead and test, that our Apache has been installed and working correctly, but first we want to ensure the IP address of our server is what we set it initially and we can do that by typing:
ip addr show eth0 | grep inet | awk '{ print $2; }' | sed 's/\/.*$//'
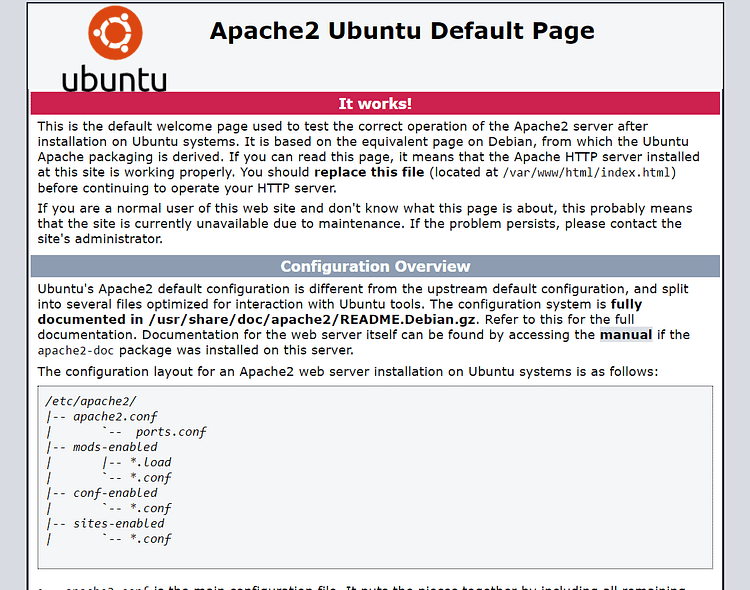
With that verified, we simply should now be able to open an Internet browser and navigate to: http://ip address, you should see the following page displayed:
Install MySQL Server
MySQL is an open Sourced Database management system, that our WordPress will be using to store it’s information. We can just as easily as Apache install it with the following command:
- Type:
sudo apt install mysql-server
After the installation is complete we want to error on the side of Security by tying up some loose ends, with this being available publicly and all:
- Type:
sudo mysql_secure_installation
Follow the prompts to change the password, delete the test DB etc. If you don’t understand what it’s asking, it’s safe to simply answer “Yes” to all questions.
Install PHP
PHP plays an important role in the LAMP stack, without getting technical just know its what is used to drive and display all the data also allowing for user interaction, with that said lets install it!
As PHP 7.4 is still fresh, and does not have support for all the necessary modules, and I am using Ubuntu 19.04, I will be using PHP 7.3 and that will require and additional Repository for installation:
- Type:
sudo apt-get install software-properties-common - Type:
sudo add-apt-repository ppa:ondrej/php - Type:
sudo apt update
Now let’s install PHP 7.3 some common modules necessary for the popular server applications to function properly:
- Type:
sudo apt-get install php7.3 libapache2-mod-php7.3 php7.3-cli php7.3-mysql php7.3-gd php7.3-imagick php7.3-recode php7.3-tidy php7.3-xmlrpc
With PHP and it’s modules installed, we need to change the way in which Apache prioritizes serving files, we want PHP files to take priority, we can do this by editing Apache’s dir.conf
- Type:
sudo nano /etc/apache2/mods-enabled/dir.conf
You should see the Following:
<IfModule mod_dir.c>
DirectoryIndex index.html index.cgi index.pl index.php index.xhtml index.htm
</IfModule>
Now we just need to make a couple changes with the nano editor so it looks like this instead:
<IfModule mod_dir.c>
DirectoryIndex index.php index.cgi index.pl index.html index.xhtml index.htm
</IfModule>
With the changes made, we will need to restart the Apache engine for those changes to take effect:
- Type:
sudo systemctl restart apache2
Now lets go ahead and test to ensure PHP is working and up & running correctly, we will do that by creating our first Web page… Well technically, but probably not what your thinking. Lets Start out with creating a new page with the following command:
- Type:
sudo nano /var/www/html/info.php
Now we want to edit this newly created blank file, by inserting the following information:
<?php
phpinfo();
?>
After you have saved the .php file and exited the nano editor, let’s open up a web browser and navigate to the following: http://IP Address/info.php and we should see the following:
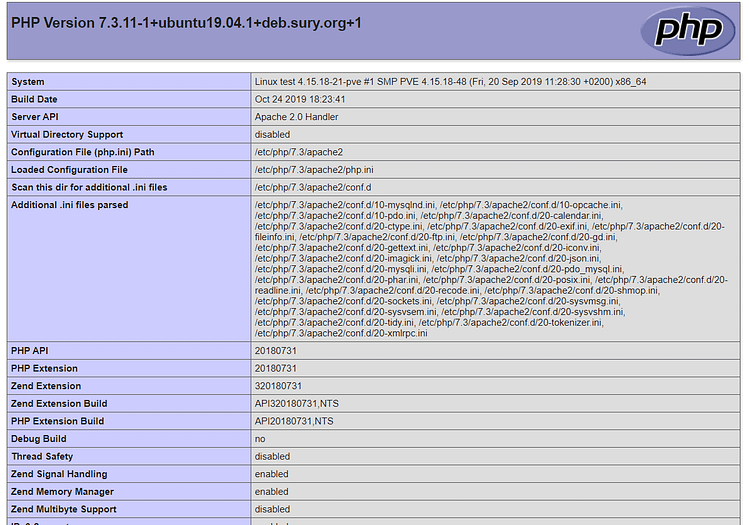
If your results are similar, congratulations you have now completed installing the LAMP stack, Though we don’t want to just leave that verification page laying around so let’s go ahead and remove it:
- Type:
sudo rm /var/www/html/info.php
There are many different modules/plugins associated with PHP that you may need in the future, and if installing other pre-built web applications such as WordPress, you may need these in the future, a quick way to view the available packages:
- Type:
apt-cache search php- | less
php7.3-bcmath - Bcmath module for PHP
php7.3-bz2 - bzip2 module for PHP
php7.3-cgi - server-side, HTML-embedded scripting language (CGI binary)
php7.3-cli - command-line interpreter for the PHP scripting language
php7.3-common - documentation, examples and common module for PHP
php7.3-curl - CURL module for PHP
php7.3-dba - DBA module for PHP
php7.3-enchant - Enchant module for PHP
php7.3-fpm - server-side, HTML-embedded scripting language (FPM-CGI binary)
php7.3-gd - GD module for PHP
php7.3-gmp - GMP module for PHP
php7.3-imap - IMAP module for PHP
php7.3-interbase - Interbase module for PHP
php7.3-intl - Internationalisation module for PHP
php7.3-json - JSON module for PHP
php7.3-ldap - LDAP module for PHP
php7.3-mbstring - MBSTRING module for PHP
php7.3-mysql - MySQL module for PHP
php7.3-odbc - ODBC module for PHP
php7.3-opcache - Zend OpCache module for PHP
php7.3-pgsql - PostgreSQL module for PHP
php7.3-phpdbg - server-side, HTML-embedded scripting language (PHPDBG binary)
php7.3-pspell - pspell module for PHP
php7.3-readline - readline module for PHP
php7.3-recode - recode module for PHP
php7.3-snmp - SNMP module for PHP
php7.3-soap - SOAP module for PHP
php7.3-sqlite3 - SQLite3 module for PHP
php7.3-sybase - Sybase module for PHP
php7.3-tidy - tidy module for PHP
php7.3-xml - DOM, SimpleXML, WDDX, XML, and XSL module for PHP
php7.3-xmlrpc - XMLRPC-EPI module for PHP
php7.3-zip - Zip module for PHP
You can read through the list, find what you need and simply install the module with:
- Type:
sudo apt install package(examp. php7.3-ldap)
Apache Virtualhosts Configuration
It is assumed you built a LAMP stack for the purpose of hosting some sort of Website/Application etc. In this case it is imperative that your server directs port forwards to the correct directory, this is done by editing the virtualHosts file that in return encapsulates the configuration details.
So in the assumption that you intend to build a website, install WordPress etc. I want to point out that the default server block on Ubuntu is in the /var/www/ directory, while there is in fact an html directory in there, if you plan to host multiple sites it’s best to stay away from that and use the directory for some default “error” page that will alert you that something isn’t working correctly.
Let’s go ahead and start out by creating a directory, if you already own a domain or have one in mind, you can use that or whichever.
- Type:
sudo mkdir /var/www/domain_name.com
Next we want to assign the correct permissions to the directory, and we can do that with the following commands:
Let’s 1st add your current sudo user to the www-data group with:
- Type:
sudo usermod -aG www-data username
Now let’s Change ownership of our websites directory with:
- Type:
sudo chown -R www-data:www-data /var/www/domain_name.com/
Lets change it so only the Group & Owners have write permissions to the files within with the following:
- Type:
sudo chmod -R 775 /var/www/domain_name.com/
Lastly let’s ensure from now on, any file or directory we create within this structure automatically inherits the group ownership.
- Type:
sudo find /var/www/domain_name.com -type d -exec chmod g+s {} \;
Alright now we have the directory all set up, let’s go ahead and create a new html file to test with the following:
- Type:
sudo nano /var/www/domain_name.com/index.html
and you can just as easily now type in something similar to this:
<html>
   <head></head>
      <body>
      <h2>This is Just a Test </h2>
      </body>
</html>
Go ahead and Save the file and exit out of the editor.
Now lets create a new VirtualHost File, by default uses the one located at:
/etc/apache2/sites-available/000-default.conf
We will create our own instead (this becomes necessary when hosting multiple domains)
- Type:
sudo nano /etc/apache2/sites-available/domain_name.com.conf
Go ahead and insert the following info:
Listen 80
<VirtualHost *:80>
     ServerAdmin admin@domain_name.com
     ServerName domain_name.com
     ServerAlias www.domain_name.com
     DocumentRoot /var/www/domain_name.com/
</VirtualHost>
Save & Exit the File
We need to now enable our domain_name.com.conf & disable our 000-default.conf files, we can do that with the 2 following commands:
- Type:
sudo a2ensite domain_name.com.conf - Type:
sudo a2dissite 000-default.conf
Now lets go ahead and restart apache so our changes will take effect
- Type:
sudo systemctl restart apache2
If you have followed along and everything has gone correctly, we should now be able to view the site by inputting the following:
http://domain_name.com
Congratulation’s you have installed the lamp stack, and configured your first website, and have the basic foundation to start building off. There are many directions you can go from here, hosting your own Home cloud Storage, WordPress Website etc.

0 Comments