So in this tutorial I am going to walk you through setting up a WordPress site on your Proxmox Server. If you haven’t already set up a LAMP stack you will need to do so, I have an update tutorial on how to do it here. WordPress if your not already aware provides the opportunity of developing dynamic webpages & blogs on the go with a wonderful GUI interface interaction. Installing WordPress will not only allow you the opportunity to host a website on your own Proxmox server but can also provide a local backup of your existing WordPress page for archiving purposes or even HADR failover redundancy.
Prerequisites:
- L.A.M.P. Stack installed (See Guide Here)
sudo apt updateapt install curl
Setting up the Mysql Database for WordPress
Lets start out by logging in to your Mysql DB.mysql -u root -p
Now we will create a new database called ‘wordpress‘, change this to anything you see fit, I am just using the obvious for this example.
CREATE DATABASE wordpress DEFAULT CHARACTER SET utf8 COLLATE utf8_unicode_ci;
Query OK, 1 row affected, 2 warnings (0.02 sec)We now need to create a user that is NOT your root, who will have all access & privilege’s to this database (Be sure to use your own choices where it’s highlighted)
CREATE USER 'username'@'%' IDENTIFIED WITH mysql_native_password BY 'password';
Now with our new user created, lets go ahead and grant them privilege’s
GRANT ALL ON wordpress.* TO 'username'@'%';
We are done with the Database, lets go ahead & Exit.
QUIT;
Installing dependent PHP packages
In my original LAMP tutorial we install PHP, and I have already included this step there, but for those who did not follow that recently updated tutorial we will need to install some helpful extensions WordPress relies on, and we can do that simply with the following command:
sudo apt install php-curl php-gd php-mbstring php-xml php-xmlrpc php-soap php-intl php-zip
Setting up For Migrating Existing WordPress Site
Now if you are following this guide to migrate a pre existing WordPress site we should make some changes at this point to get it out of the way. the issue is your Download & Upload limits are a bit low, so we should adjust those to account for the large file you will be uploading containing your current sites configuration & Database. Otherwise if you are not migrating you can skip this step.
In effort to change the values that WordPress adheres to, we need to edit the php.ini file, this can be done with the following command
sudo nano /etc/php/7.4/apache2/php.ini
you want to search for the following lines and change their values to whatever suits your needs:
Upload max filesize
PHP post max size
with those updated we will need to restart apache which we can do with the following command:
sudo systemctl restart apache2
Configuring Apache for WordPress
Now Moving on we need to create our apache configuration files in which will point to our directory in which we intend to install WordPress (the one we created earlier) and we can simply do this with the following command:
sudo nano /etc/apache2/sites-available/wordpress.conf
We now want to add the following information to the new file, and ensure we change the values with domain-name.com being the directory in which we set up earlier.
<VirtualHost *:80>
      ServerAdmin [email protected]
      ServerName domain-name.com
      ServerAlias www.domain-name.com
      DocumentRoot /var/www/domain-name.com/
<Directory /var/www/domain-name.com/>
     AllowOverride All
</Directory>
</VirtualHost>
Go ahead and save and exit the editor.
Now we need to create the symlinks for the module we updated with the following command
sudo a2enmod rewrite
We will now check to ensure we did everything right, and there is no errors in our updates
sudo apache2ctl configtest
Now lets reboot the apache module for the changes to take effect
sudo systemctl restart apache2
Downloading the WordPress Installer
We now will need to download WordPress, we will download the tar file into the tmp directory to prepare the files before moving them to their permanent destination.
Navigate to our tmp directory:
cd /tmp
Download the latest WordPress Release
curl -O https://wordpress.org/latest.tar.gz
Now Let’s untar it
tar xzvf latest.tar.gz
Let’s create a blank .htaccess file for our WordPress sight, missing this step can lead to issues after install
touch /tmp/wordpress/.htaccess
Now we will rename the Config file included to be recognized by wordpress as we will be editing it here in a moment.
cp /tmp/wordpress/wp-config-sample.php /tmp/wordpress/wp-config.php
We now need to create a directory for future WordPress upgrades to be downloaded to, so we can easily upgrade via the web interface
mkdir /tmp/wordpress/wp-content/upgrade
Now lets recursively copy our files from the tmp directory to the directory you created in my LAMP stack tutorial changing the command to reflect your directories name, if you did not follow that tutorial, or do not have a directory for the Domain Name in which you choose to use you can so so very easily by typing the following command:
sudo mkdir /var/www/domain_name.com
Otherwise let’c continue to moving the WordPress files over
sudo cp -a /tmp/wordpress/. /var/www/domain-name.com
Setting Privilege’s for Directories, Users, & Groups
We now want to change ownership of this directory to the www-data user, this is for security reasons, this will ensure that only this user has access to only these files in the event of your site being compromised, vs assigning it to say the root user, then if compromised so is your entire container and all files within.
sudo chown -R www-data:www-data /var/www/domain-name.com
Lets now set the privilege’s for all files contained within our directory so that User has Read/Write access, the Group will have Read Access while other users will have no access
sudo find /var/www/domain-name.com/ -type d -exec chmod 750 {} \;
Lastly we will now set the privilege’s for all directories contained within our domain-name.com directory by giving our user read, write, execute and assigning the group to have read and execute privilege’s, but also ensuring once again no other users have any permissions.
sudo find /var/www/domain-name.com/ -type f -exec chmod 640 {} \;
Generating WordPress Security Keys
WordPress has constant communication with the Mysql DB in which we set up earlier in this tutorial, in fetching and writing data it uses security keys. We could in fact manually set all these keys ourselves to whatever we want, but as most users will just set these once then never look at them again, its probably a better option to let WordPress generate extremely strong random keys for us to use. We can do this with the following command:
curl -s https://api.wordpress.org/secret-key/1.1/salt/
The command will return something similar, we want to go ahead copy this in its entiretry or you can just grab the yellow highlighted keys (Do not use what is printed below!)
define('AUTH_KEY', 'igH&Z{(t/MO_/0kbLLwVx$W~q/:[gO@PcG$V -BtyNa?XNx{7re1k%3X&Xh{8h*C');
define('SECURE_AUTH_KEY', 'y H0h8L$QBc<X>zp/1W%|Vq!K}$c-XAL#~sPNt5j9}1v=Q(-=;1j+=M=vR3!iUil');
define('LOGGED_IN_KEY', 'u`)t/$m%prAy`X9M3ao|%KF$Uk::SZl-*#W[vUw18~!rpL4jcL^WmJDew ]u:1W~');
define('NONCE_KEY', '$33vGiDB-/$8b8[Ufil{bE[^|!B[k8D}a9}_2],!::},*4T&QVah<npsk31?P)3q');
define('AUTH_SALT', 'yg2R?VJ3LO|bw>o-?-#AasXKd)kZ6`}o-4(b(BK%O(#PO:Cv`GkX|/};)^vj|OZc');
define('SECURE_AUTH_SALT', 's469]3z+5.XL=RSeau$7rhM+;-|bP(Y6JIDe9rkwzP@zS2DU{x;{f,65V_~o~!OR');
define('LOGGED_IN_SALT', ';kGk|gF7*%wmi6d7U2%W~Us0iWH~<oL(YWo89iQtc|$4?&QrD%Fy|XQ{<u+^I^i$');
define('NONCE_SALT', '2+3lb*ON0_~+gs=K,BFo^bkiA&8 ir-g+!S([}*u|e,+hB,lX5/tG5haq4cHjyRs');
Now with the text/keys copied let’s go ahead and edit that wp-config file we renamed earlier, we can do that by opening it up in nano.
sudo nano /var/www/domain-name.com/wp-config.php
You will see the following Screen, we need to update the DB_NAME, DB_USER, and DB_PASSWORD we set up at the beginning of this tutorial replacing the red text with your own values.
We Will also need to replace the yellow highlighted text with the newly generate keys we just copied in the previous step.
And lastly we want to add the following line at the bottom of the file in Red (define(‘FS_METHOD’, ‘direct’);)
// ** MySQL settings - You can get this info from your web host ** //
/** The name of the database for WordPress */
define( 'DB_NAME', 'wordpress' );

/** MySQL database username */
define( 'DB_USER', 'username' );

/** MySQL database password */
define( 'DB_PASSWORD', 'password' );

/** MySQL hostname */
define( 'DB_HOST', 'localhost' );

/** Database Charset to use in creating database tables. */

/**#@+
* Authentication Unique Keys and Salts.
*
* Change these to different unique phrases!
* You can generate these using the {@link https://api.wordpress.org/secret-key/1.1/salt/ WordPress.org secret-key service}
* You can change these at any point in time to invalidate all existing cookies. This will force all users to have to log in again.
*
* @since 2.6.0
*/
define( 'AUTH_KEY', 'put your unique phrase here' );
define( 'SECURE_AUTH_KEY', 'put your unique phrase here' );
define( 'LOGGED_IN_KEY', 'put your unique phrase here' );
define( 'NONCE_KEY', 'put your unique phrase here' );
define( 'AUTH_SALT', 'put your unique phrase here' );
define( 'SECURE_AUTH_SALT', 'put your unique phrase here' );
define( 'LOGGED_IN_SALT', 'put your unique phrase here' );
define( 'NONCE_SALT', 'put your unique phrase here' );

/**#@-*/

define('FS_METHOD', 'direct');
Ok with that done we cab go ahead and save and exit, and we should be good to finish our setup!
Getting our IP Address & Launching WordPress
Let’s start off by ensuring we have the correct ip address of our container where our new WordPress sight is being hosted we can do this with the following command:
ifconfig | sed -En 's/127.0.0.1//;s/.*inet (addr:)?(([0-9]*\.){3}[0-9]*).*/\2/p'
Now we can go ahead and open our browser and direct it to the output we just got, and if everything went correctly you should see something similar to the image below.
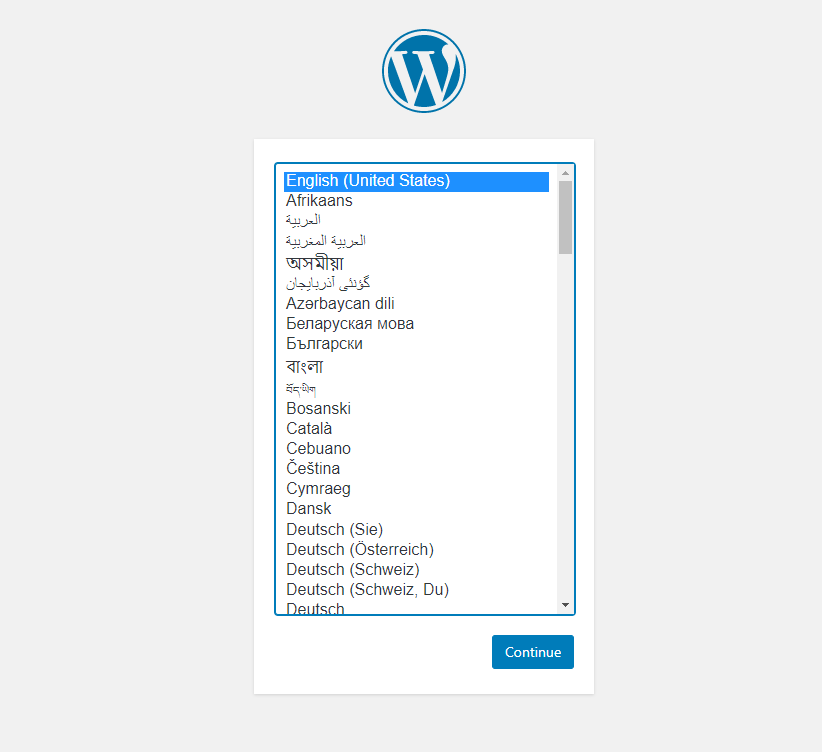
At this point we can go ahead and select our country of Origin and click Continue to Choose our Site Name, Username, Password, & Email.
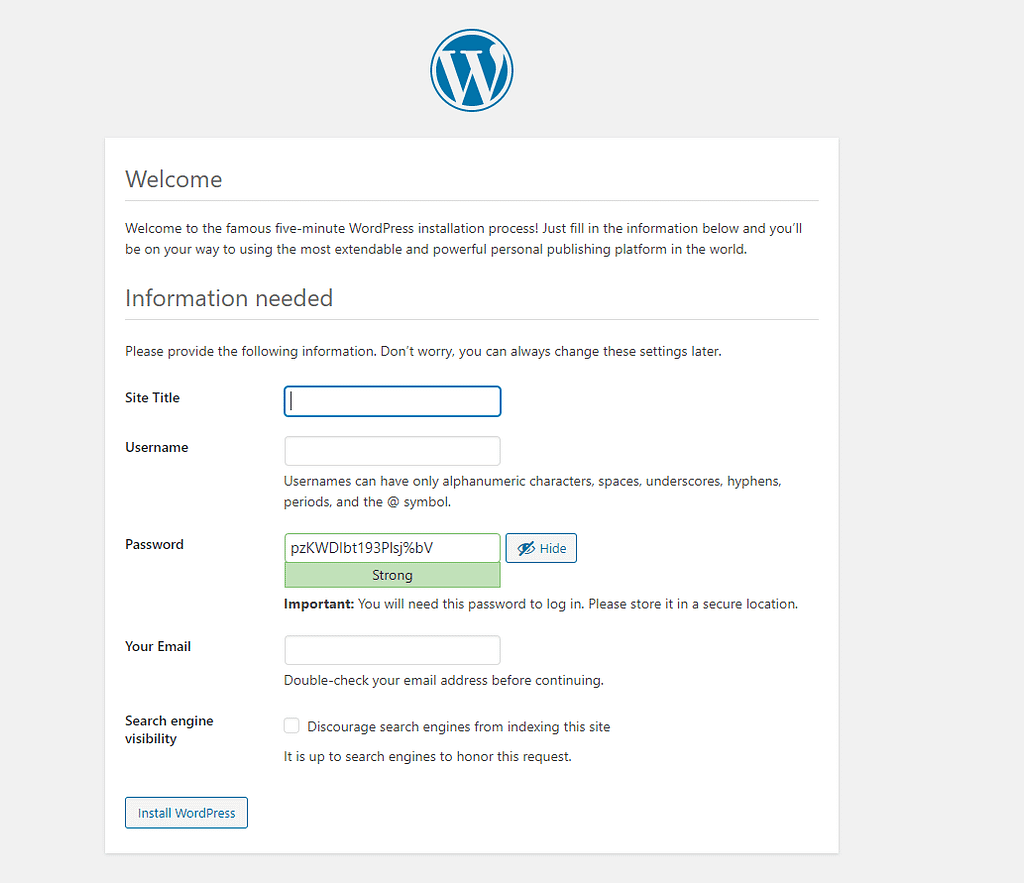
Once this is created you can now Click on Install WordPress and let it finish the process.

Assuming you have done everything correctly, your WordPress should now be installed, you can now click the Login Button or in the event you need to login at a later time you can navigate to www.yoursiteaddress.com/wp-admin

After logging in with your designated Username & Password you will be taken to your dashboard

From this point on you can control everything including updating the WordPress installation, Plugins, and Themes! This includes installing new themes and plugins, creating new pages and posts.
Though before we wrap this up I would like to mention one important feature you should check regularly and that is the Site Health, this can be found under the tools option in the left hand pane.

Select Site Health and see the following displayed

While WordPress will indicate when plugins or theme are out of date, this will provide further analysis pointing out other issues such as your php install being out of date and potential other issues with your server as well. So its good to ensure you regularly check this screen to ensure your site is always secure.
Congratulations, you now have WordPress up and running on your home server. I will go into depth in a later tutorial on how to set your site up with an SSL certificate and domain name to be visible to everyone, and further down the road I will be doing another tutorial on creating subdomains for the addition of cloud storage.


0 Comments