Storing Backup Snapshots of VM’s & Containers is important in terms of restoring information in the event of a failure or other catastrophe, and even more so in a production environment. While the options are readily available in proxmox, it is not exactly the easiest to utilize, and sifting through all of the old (and some outdated) official texts, can make what appears to be as easy and clicking a few options, into a real headache.
This guide will walk you through taking whatever available form of storage you intend to use (USB, HDD etc.) and format it correctly, map the drive, and get you started backing up!
- Let’s start by ensuring we have the new media we want to use inserted or plugged in correctly.
- Open a puTTy session, log into root
- Type:
lsblkyou should see a similar output:
NAME                               MAJ:MIN RM   SIZE RO TYPE MOUNTPOINT
loop0                                7:0    0    20G  0 loop
sda                                  8:0    0 931.5G  0 disk
└─sda1                               8:1    0 931.5G  0 part
  └─Data--Storage-vm--100--disk--0 253:2    0   931G  0 lvm
sdb                                  8:16   0   5.5T  0 disk
└─sdb1                               8:17   0   5.5T  0 part
  └─NAS--Storage-vm--101--disk--0  253:1    0   5.3T  0 lvm
sdc                                  8:32   0   5.5T  0 disk
└─sdc1                               8:33   0   5.5T  0 part
  └─NAS--Storage2-vm--101--disk--0 253:0    0   5.3T  0 lvm
sdd                                  8:48   1  28.9G  0 disk
nvme0n1                            259:0    0 931.5G  0 disk
├─nvme0n1p1                        259:1    0 899.6G  0 part /
├─nvme0n1p2                        259:2    0     1K  0 part
└─nvme0n1p5                        259:3    0    32G  0 part [SWAP]
I added a 32GB thumb drive, as you can see it’s name is sdd, now lets check to see if we have parted installed to do the format.
- Type:
apt policy parted
parted:
  Installed: 3.2-17
  Candidate: 3.2-17
  Version table:
 *** 3.2-17 500
        500 http://ftp.debian.org/debian stretch/main amd64 Packages
        100 /var/lib/dpkg/status
If you do not have parted installed Type: apt install parted
We will now format a new GPT Partition table:
- Type:
parted /dev/sdd mklabel gpt
Convert the entire primary partition to ext4:
- Type:
parted -a opt /dev/sdd mkpart primary ext4 0% 100%
Now let’s label our new partition:
- Type:
mkfs.ext4 -L storageprox /dev/sdd - Verify the following output and press “y” on proceed anyway
mke2fs 1.43.4 (31-Jan-2017)
Found a gpt partition table in /dev/sdd
Proceed anyway? (y,N) y
Creating filesystem with 7569408 4k blocks and 1892352 inodes
Filesystem UUID: xxxxxxxx-xxxx-xxxx-xxxx-xxxxxxxxxxxx
Superblock backups stored on blocks:
        32768, 98304, 163840, 229376, 294912, 819200, 884736, 1605632, 2654208,
        4096000

Allocating group tables: done
Writing inode tables: done
Creating journal (32768 blocks): done
Writing superblocks and filesystem accounting information:
done
- Let’s verify our changes Type:
lsblk -fs
NAME      FSTYPE   LABEL       UUID                                   MOUNTPOINT
loop0     ext4                 xxxxxxxx-xxxx-xxxx-xxxx-xxxxxxxxxxxx
sdd       ext4     storageprox xxxxxxxx-xxxx-xxxx-xxxx-xxxxxxxxxxxx
NAS--Storage2-vm--101--disk--0
│
└─sdc1    LVM2_mem             xxxxxx-xxxx-xxxx-xxxx-xxxx-xxxx-xxxxxx
  └─sdc
NAS--Storage-vm--101--disk--0
│
└─sdb1    LVM2_mem             xxxxxx-xxxx-xxxx-xxxx-xxxx-xxxx-xxxxxx
  └─sdb
Data--Storage-vm--100--disk--0
│
└─sda1    LVM2_mem             xxxxxx-xxxx-xxxx-xxxx-xxxx-xxxx-xxxxxx
  └─sda
nvme0n1p1 ext4                 xxxxxxxx-xxxx-xxxx-xxxx-xxxxxxxxxxxx   /
└─nvme0n1
nvme0n1p2
└─nvme0n1
nvme0n1p5 swap                 xxxxxxxx-xxxx-xxxx-xxxx-xxxxxxxxxxxx   [SWAP]
└─nvme0n1
Let’s now create a directory to mount the drive too:
- Type:
mkdir -p /mnt/data
Now we will edit File System Table with our mounting options:
Type: nano /etc/fstab
- Add the following line to the file
LABEL=storageprox /mnt/data ext4 defaults 0 2We will now mount our drive:
- Type:
mount -a
We can verify it is mounted:
- Type:
lsblk -fs
NAME      FSTYPE   LABEL       UUID                                   MOUNTPOINT
loop0     ext4                 xxxxxxxx-xxxx-xxxx-xxxx-xxxxxxxxxxxx
sdd       ext4     storageprox xxxxxxxx-xxxx-xxxx-xxxx-xxxxxxxxxxxx  /mnt/data
NAS--Storage2-vm--101--disk--0
Now the drive has been mounted, we need a directory in which we can store our snapshot files.
Type: mkdir -p /mnt/data/backup/
- With that part done, Open up your proxmox gui interface.
- Navigate to Datacenter > Storage > Add > Directory
- input the following:
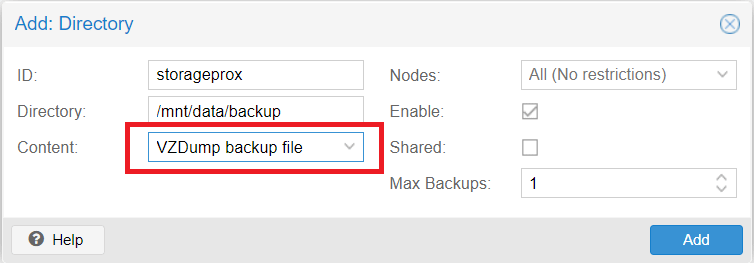
The Content menu is a multi Selection drop down, so be careful that you only have “VZDump backup file” selected, otherwise the process will not work.
Now you are set to and ready to make backups, you will now have the ability to populate the “Storage” option with “storageprox”. If you would like to set a scheduled backup of one or multiple VM’s simply navigate to: Datacenter > Backups > Add
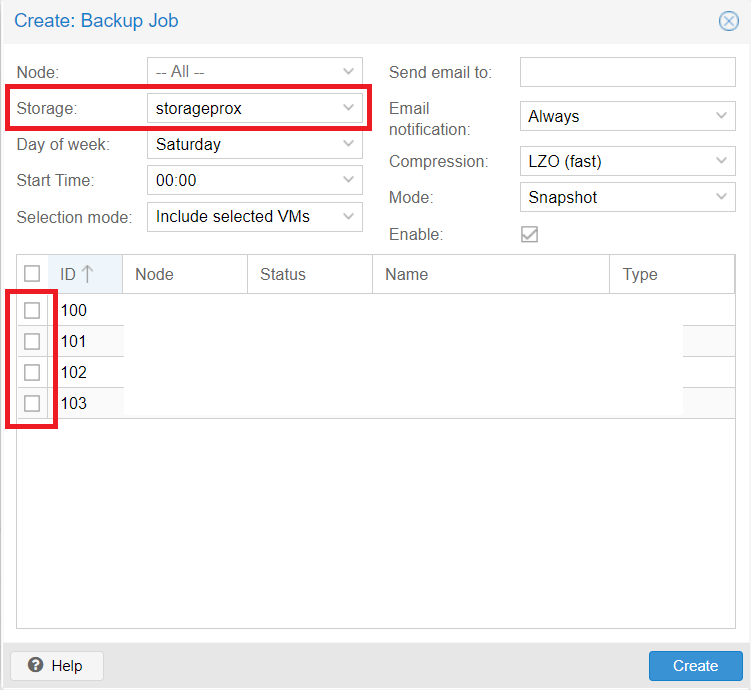
Otherwise if you would simply like to take a quick backup of a single VM or container you can do so by selecting the individual VM/Container and selecting “Backup” sub menu:

One thing to keep in mind is when taking a snapshot via proxmox, it copies “Everything”. So if you have a VM that totals out 10GB of space, you will get a backup of that 10GB compressed. This also applies to additional drives that may be attached to the VM, such as a Synology VM with 2 additional 6TB drives, it will be trying to take a snapshot of 12TB +.


0 Comments