So it all started in the late 90’s when MAME was new and catching momentum in the early developing emulation scene. Coin Ops were ecstatic to get the EEPROM images in effort to fix up old PCB Boards, while the typical enthusiast was happy to finally get a chance to relive their childhood time spent in the Arcades.
Things have changed immensely in my life from 2 decades ago. My Cabinets are in storage for a couple more years, and after upgrading my raspberry pi and downloading the most recent image of retro pie, I decided to fool around with it and see what’s changed in the last couple years. This inevitably put me back into a MAME kick. Don’t get me wrong, 8bitdo makes a great controller, but its not ideal for games that were developed around joysticks and buttons. Hence the idea for a small Joystick setup compatible with the pi/pc, that could easily be put away without taking up too much space.
So in comes the “fightstick”. After looking what was available on the market, nothing more than the outrageous price tags caught my eye. I ended up coming across a sight called “Tek-Innovations” at first, which got the creative inner me hyped up for doing my own custom design. To make a long story short I finally decided upon AllfightSticks.Com for the case.
As for those who are aware of the term “fightStick”; Sanwa is most likely nothing new to you, though I have known of the brand; I’m personally more familiar with Happ Controls. With most fightstick’s being designed around Sanwa controls & Allfightsticks being of no exception, I decided to give them a shot with the majority of parts being ordered from FocusAttack. It also came to my attention that Aaron at AFS worked with Focus Attack, and could get a template in effort to utilize their Laser Etching services (An idea I had gotten from Tek-Innovations). I spent some time on Photoshop preparing an image for etching, though things look a bit different in an “Inverted” view; I think it turned out looking good.
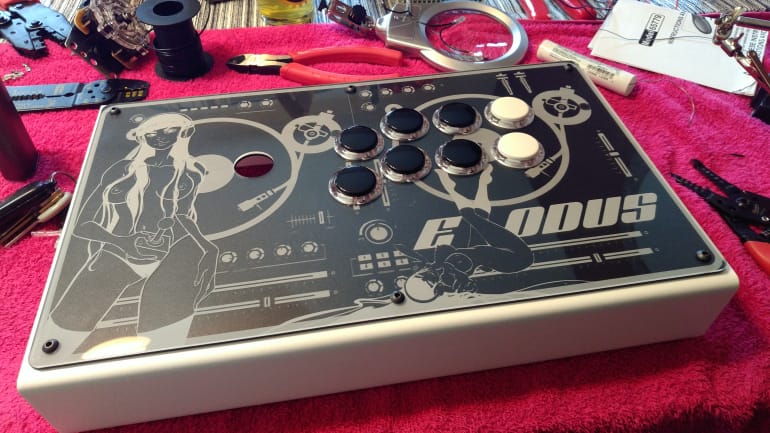
As all the parts came in different shipments, I had to wait for the plexi to arrive (The last) in order to proceed as it had to be mounted prior to the controls. Here is the Plexi Mounted to the top portion of the Case.
I spent some time planning out how exactly I wanted to wire the controls, more importantly where I was going to mount the PCB. I decided to go with an iPac as I have purchased several over the years for miscellaneous MAME builds and Arcade Restores, so being familiar with the product, and never having a single issue I opted to go with Ultimarc over Brooks which appears to be the more popular choice.
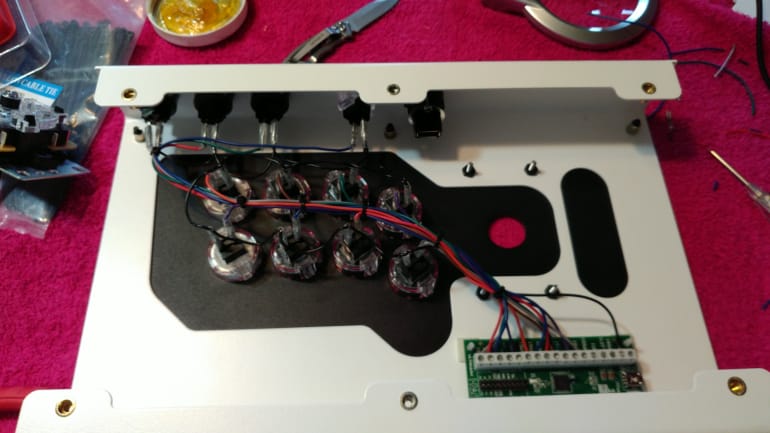
The button holes and pre-installed Joystick mount were all precisely drilled, so snapping things into place was a breeze. I decided to leave the Joystick Harness alone in terms of length as you never know if you might re-purpose it, and it’s not like the case will be opened back up for viewing anytime soon. The Cable that came with the iPac is 6′ I believe, and required an extra command strip connect to fasten down. If I had taken this into consideration beforehand I would have purchased a separate shorter cord.

The more frustrating part of the build was the Sanwa connectors being only .187″ (Extremely odd Sized) with no crimps I had carefully crimp each wire with a set of needle nose pliers, followed by soldering the wire to the connect for a long lasting hold.

As you can See in the completed builds there are 12 Buttons starting from the top the black represent Buttons 1 ~ 6 in MAME, with the Whites being Buttons 7 ~ 8 (Macros) On the Back starting from the Middle Clear Coin 1, P1 Start, Pause, Ctr, with ctrl + P1 exiting the current game.


0 Comments