So here is a guide on passing through your Graphics Card to a Windows 10 Virtual Machine on Proxmox 5.3. While searching for answers it was very apparent many others were having difficulties like me. So after getting it up and running I decided to post a guide. While there are only a few subtle differences from the a couple of the guides out there, I have emphasized on a couple steps where little explanation has been given and might be holding others up. So Lets get on with it!
I would like to first give credit to the ops who posted guides before me, that helped me immensely! You can check those out for further resources:
First check if you are new to this, you want to ensure you have the following options enabled in your BIOS:
- UEFI
- VT-d
- Multi-monitor mode
Now lets get a command line, via the shell puTTy etc.
Lets type:
nano /etc/default/grub
and lets look for the following line: “GRUB_CMDLINE_LINUX_DEFAULT=”quiet”
OK we want to change this line to one of the following based on the CPU
If you have an AMD Chip change it to this:
GRUB_CMDLINE_LINUX_DEFAULT="quiet iommu=pt amd_iommu=on video=efifb:off"
Otherwise if using an Intel Chip change to this:
GRUB_CMDLINE_LINUX_DEFAULT="quiet intel_iommu=on video=efifb:off"
Now lets Save that and exit
Type:
update-grub
Then lets go ahead and Reboot The Server
With the server rebooted and back on lets make sure our changes have taken effect with the following command:
/etc/default# dmesg | grep -e DMAR -e IOMMU
we should see something like this:
[    xxxxx] AMD-Vi: IOMMU performance counters supported
[    xxxxx] AMD-Vi: Found IOMMU at 0000:00:00.2 cap 0x40
[    xxxxx] perf/amd_iommu: Detected AMD IOMMU #0 (2 banks, 4 counters/bank).
[    xxxxx] AMD IOMMUv2 driver by Joerg Roedel
So from what i understand we want to blacklist the major GPU manufactures in an attempt to prevent Proxmox from loading the drivers for the Video Card, I misunderstood this the first time and only blacklisted the Cards i didn’t have, and things seem to be working, so if you can’t get your card to pass through, you might want to come back to this step and remove your card from the blacklist, otherwise lets just be safe and blacklist all 3 (unless your Running Multiple GPU’s, only blacklist the one you intend to passthrough)
We can do this by running each command separately
echo "blacklist nouveau" >> /etc/modprobe.d/blacklist.conf
echo "blacklist nvidia" >> /etc/modprobe.d/blacklist.conf
echo "blacklist radeon" >> /etc/modprobe.d/blacklist.conf
Now lets just check that file to ensure our changes have taken effect:
cat /etc/modprobe.d/blacklist.conf
Lets go ahead and apply those changes to the system running with the following command:
update-initramfs -u
If everything looks good, go ahead and begin loading the Kernel modules by inputting each of the following separately:
echo vfio >> /etc/modules
echo vfio_iommu_type1 >> /etc/modules
echo vfio_pci >> /etc/modules
echo vfio_virqfd >> /etc/modules
Alright, so the next step is to get the ID of our graphics card, though its important to know if you change the hardware within the system (Add/Remove) these ID’s can change and require you to run through these steps again making updates with the new IDS
lspci -v
We will then get a long printout listing the ID’s of all components, but in particular we would like to look for our graphics card that should look similar to this:
09:00.0 VGA compatible controller: Advanced Micro Devices, Inc. [AMD/ATI] Ellesm                                    ere [Radeon RX 470/480] (rev ef) (prog-if 00 [VGA controller])
        Subsystem: ASUSTeK Computer Inc. Ellesmere [Radeon RX 470/480]
        Flags: bus master, fast devsel, latency 0, IRQ 14
        Memory at e0000000 (64-bit, prefetchable) [size=256M]
        Memory at f0000000 (64-bit, prefetchable) [size=2M]
        I/O ports at d000 [size=256]
        Memory at fce00000 (32-bit, non-prefetchable) [size=256K]
        Expansion ROM at 000c0000 [disabled] [size=128K]
        Capabilities: [48] Vendor Specific Information: Len=08
        Capabilities: [50] Power Management version 3
        Capabilities: [58] Express Legacy Endpoint, MSI 00
        Capabilities: [a0] MSI: Enable- Count=1/1 Maskable- 64bit+
        Capabilities: [100] Vendor Specific Information: ID=0001 Rev=1 Len=010
        Capabilities: [150] Advanced Error Reporting
        Capabilities: [200] #15
        Capabilities: [270] #19
        Capabilities: [2b0] Address Translation Service (ATS)
        Capabilities: [2c0] Page Request Interface (PRI)
        Capabilities: [2d0] Process Address Space ID (PASID)
        Capabilities: [320] Latency Tolerance Reporting
        Capabilities: [328] Alternative Routing-ID Interpretation (ARI)
        Capabilities: [370] L1 PM Substates
        Kernel driver in use: vfio-pci
        Kernel modules: amdgpu

09:00.1 Audio device: Advanced Micro Devices, Inc. [AMD/ATI] Device aaf0
        Subsystem: ASUSTeK Computer Inc. Device aaf0
        Flags: bus master, fast devsel, latency 0, IRQ 11
        Memory at fce60000 (64-bit, non-prefetchable) [size=16K]
        Capabilities: [48] Vendor Specific Information: Len=08
        Capabilities: [50] Power Management version 3
        Capabilities: [58] Express Legacy Endpoint, MSI 00
        Capabilities: [a0] MSI: Enable- Count=1/1 Maskable- 64bit+
        Capabilities: [100] Vendor Specific Information: ID=0001 Rev=1 Len=010
        Capabilities: [150] Advanced Error Reporting
        Capabilities: [328] Alternative Routing-ID Interpretation (ARI)
        Kernel driver in use: vfio-pci
        Kernel modules: snd_hda_intel
As we see the Video/Audio we only need the 1st ID, in my case 09:00, with this we can find the Vendor ID’s with the following command:
lspci -n -s 09:00
You will get something that looks like this:
root@pam:/etc/default lspci -n -s 09:00
09:00.0 0300: 10de:1c81 (rev a1)
09:00.1 0403: 10de:0fb9 (rev a1)
With those ID’s we can execute the following command to assigning VFIO (Virtual Function I/O) Drivers to the Graphics card:
echo options vfio-pci ids=10de:1c81,10de:0fb9 disable_vga=1 > /etc/modprobe.d/vfio.conf
Now that this is done, lets reboot our server once again.
Lets ensure our changes have taken effect by using the following command once again:
lspci -v
and ensure you see the following line:
“Kernel driver in use: vfio-pci” for both ID’s, in my case 09:00.0 & 09:00.1
Now it’s time to Create our Virtual machine, Mine differs in a couple ways opposed to others but this is the way I have found it to work, I have tried other suggestions with no luck, but feel free to experiment with your own VM’s
Create the VM
[GENERAL]
Name: (Windows10)
[OS]
ISO Image: Windows 64 Image
Type:Windows (10/2016)
[HARD DISK]
Bus/Device: VirtIO Block
Disk Size: 128GB
Format: QEMU Image Format (qcow2)
Cache: Write Back
[CPU]
Sockets: 1 (Unless you have more than 1 physical Sockets)
Cores: However many you want, I select 4-8
Type: Host
Memory: 4GB +
Model: VirtIO (paravirtualized)
Once done and confirmed we have a couple more things to work out, with the new Virtual Machine selected, lets click on the following pages and make the following changes:
OPTIONS
Boot Order: CD-Rom, virtio0, Network
SCSI Controller: VirtiO SCSI
BIOS: OVMF (UEFI)
HARDWARE
Add CD/DVD Device -> Sata-> VirtIO Drivers ISO
Add EFI Disk
Now It’s time to go back to the terminal for another command before we can install Windows: (Make sure you substitute the 101.conf for Number of your own VM)
echo machine: q35 >> /etc/pve/qemu-server/101.conf
IMPORTANT PLEASE READ!!!!
Before we start up I want to explain some of my observations, before you get frustrated, feel as if it doesn’t work etc. First and Foremost, UEFI Has to be configured, if Not this is not going to work! Now When you click on “Start” to boot this machine for the 1st time, there is no need to go to the BIOS if following my directions, so don’t worry about that, if you are starting the machine up, and only getting a black screen then pushed into shell the problem most likely isn’t your settings, its most likely the Win10 Image you are using! As of Today’s date I can’t even get the official Windows 10 Image directly from Microsoft’s website to work in which I later found that Proxmox 5.3 Win 10 VM Does not appear to be compatible with the new 1806 Distribution UPDATE: The newest ISO on Microsoft’s site 1903 does work! (also Pre Activated ISO’s don’t appear to work either) When you get a good ISO, you will go from the Proxmox logo to a “Press any key to boot from CD-Rom” And the Windows Installation should proceed normally from there.
Now once windows is installed it is very important that we set up a form of remote access to ensure we can access the VM And verify it is working, as once we pass through the Video Card the Proxmox console will no longer work, so lets do that now. You are free to choose whichever method you prefer, but for this tutorial i will be using Remote Desktop:
- In the windows Search/Cortana Type: Allow Remote Access to Computer
- Now Click on that and “System Properties” With “Remote” tab should pop up!
(Set yours up as in the image)
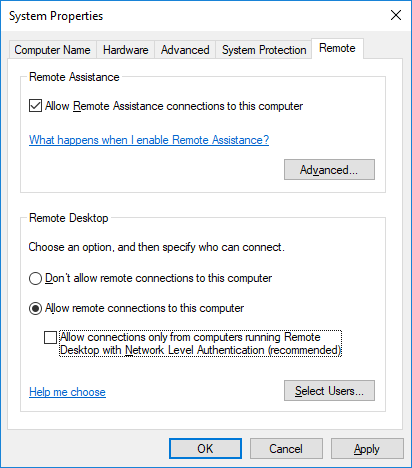
- Press Ok!
After this is done, on the Computer you are using to access your proxmox gui (If windows)
- Lets type in the windows search bar once more: Remote Desktop Connection
- Put in the new Static IP You set and ensure we have a working connection!
- Ok lets shut down Windows 10 via the console.
- If you haven’t already, lets plug a keyboard and mouse into the Server.
- With the Windows 10 VM selected, go back to the Hardware page and add these devices:
Add USB Device
Use USB Port: Select Mouse/Keyboard
lets go ahead and Start Windows 10 again, lets ensure our keyboard and mouse function, you will be cable to see this through the console or Remote Desktop connection, once we have confirmed now is a good time to pull up an internet browser and download the latest Windows Drivers for your Video card to have ready for installation.
In the meantime you may not have noticed but Windows is attempting Updates in the Background, we don’t want to let this get to far as if it gets to the 1806 Package we are going to start seeing several issues and Failures so we need to shut this down with Microsoft’s Show or hide updates Tool, it can be downloaded from here
Once Downloaded, Select Next and let it do it’s thing, Now Select “Hide Updates” and check the box next to the 1806 Update, Click Next, then close!

Alright! We are now ready for the moment of truth, lets go ahead once more and shut down the Windows 10 Virtual machine and get back to the terminal
Now let’s pass through this video card with the following command substituting your own VM’s Number:
echo hostpci0: XX:XX,x-vga=on,pcie=1 >> /etc/pve/qemu-server/101.conf
So if everything has gone as planned, when you start up the Windows 10 VM you should see no errors, and you should also see no console anymore (As your Windows VM is now using the GPU instead)
- Give it a Minute to load the OS
- Use your Remote Desktop App to Remote into the OS and Verify it is working
- Connect your (PVI, VGA, HDMI) to your (TV, Monitor)
- Install those Video Card Drivers we downloaded earlier
Upon Installing the proper graphics driver, the GPU should begin working and the display should come up on your Monitor/TV. Congratulations! You have successfully passed through your GPU!
If, you were unable to get it to work, I would suggest going back to the top and reading my paragraph on blacklisting, possibly removing your card from the list and giving it a shot otherwise check the links I posted at the top to my sources for additional information. If using an NVIDA card, it might be that you are intentionally be prevented from passing through and additional adjustment will have to be made.


0 Comments